Blast Furnace Strategy Guide
Tip: Click map to zoom
Tip: Click map to zoom
Tip: Click map to zoom
Tip: Click map to zoom
Tip: Click map to zoom
Tip: Click map to zoom
Tip: Click map to zoom
Tip: Click map to zoom
Tip: Click map to zoom
The Blast Furnace, a multiple-add fight includingForeman Feldspar and theHeart of the Mountain, is the third and final boss of the Slagworks wing of the Blackrock Foundry raid. The encounter becomes accessible after players defeatGruul andOregorger.
This Blackrock Foundry raid strategy guide provides an overview of killing The Blast Furnace for raid leaders as well as specific tips for tanks, healers, and dps. It also includes information on harmful trash, and screenshots of harmful abilities.
This guide provides an in-depth look at Normal and Heroic difficulties, with summaries of changes in Mythic and Looking for Raid difficulties.
Looking to log a fight and improve your performance? Go to Warcraft Logs for logs, advanced fight analysis, replays, and more!
Table of Contents
Loot and Rewards
This loot overview helps you plan out your Seal of Tempered Fate Bonus Rolls. Check out ourBlast Furnace database page to filter loot by difficulty as well as by loot specialization.
| LFR (650)
|
Normal, Heroic, Mythic (665, 680, 695)
-
-
-
-
-
-
Cape: none
-
Ring: none
-
-
-
Armor Token: Tier Legs
|
 Elemental Rune for the legendary questline can be obtained while on
  Might of the Elemental Lords.
Each Blackrock Foundry boss, as well as Highmaul bosses, has a unique achievement that counts towards  Glory of the Draenor Raider. This rewards
  Gorestrider Gronnling. Blast Furnace's special achievement is
  Ya, We've Got Time....
There are achievements for killing each Blackrock Foundry boss, as well as Highmaul bosses, on Mythic difficulty. Killing every boss rewards  Mythic Draenor Raider, which allows you to place a special monument in your Garrison.
Notable Trash Mobs

LOS Blast Wave behind spikes
A massive Slag Behemoth guards the entrance to the Blast Furnace. He has three abilities players must contend with:
 Ignite will target a random player; after several seconds, that player will detonate, dealing moderate damage to players within 5 yards.
- The Slag Behemoth throws a
 Volcanic Bomb at a random player, which knocks back and damages all players near the point of impact.
- The Volcanic Bomb also creates a spike at the impact location, which blocks line of sight.
- The Slag Behemoth will emit a
 Blast Wave, dealing heavy raid-wide damage. Players can avoid this damage by line-of-sighting the boss behind a spike created by the Volcanic Bomb.
The raid should stay spread out while fighting the Slag Behemoth, to minimize damage and movement due to Ignite and Volcanic Bomb. When Blast Wave occurs, players should position so that one of the spikes breaks their line of sight to the boss. Blast Wave occurs in pairs approximately 5 seconds apart, with approximately 30 seconds between each pair; after the second Blast Wave, the existing spikes are destroyed.
Blast Furnace Tips & Strategy
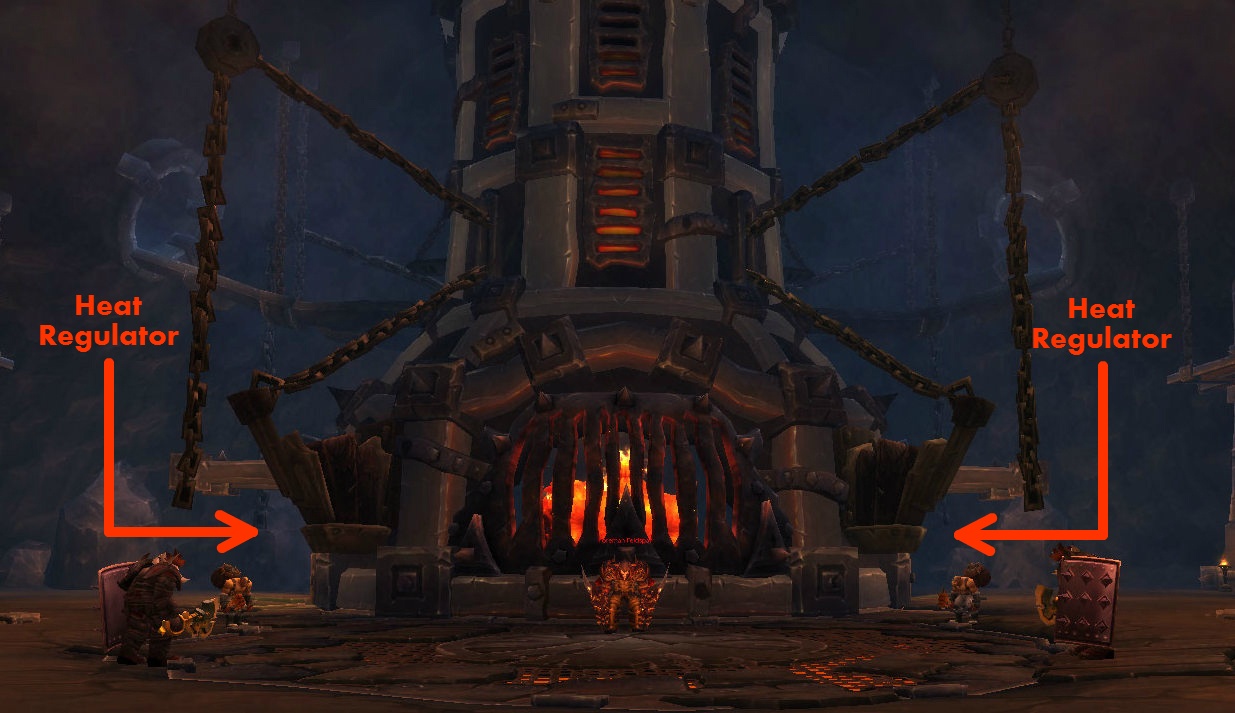
Destroying the Heat Regulators is the first, and hardest, step
Blast Furnace is a complex, multi-phase fight that emphasizes target prioritization and has heavy movement requirements. The encounter is broken into three parts, each with a simple objective:
- Phase 1: Destroy the Heat Regulators on either side of the Blast Furnace
- Phase 2: Defeat the four Primal Elementalists who have captured the Heart of the Mountain
- Phase 3: Defeat the Heart of the Mountain
When players approach the Blast Furnace, there will be several enemies active - Foreman Feldspar, two Security Guards, and two Furnace Engineers. These are not trash mobs; they are part of the first phase of the encounter and will respawn every time the raid wipes.
The raid will need to split into two roughly equal halves to handle the first phase of the encounter, so before initiating the fight, players should assign 1 tank, half the DPS, and half the healers to each side of the room.
- Each tank will take one Security Guard and one Furnace Engineer with them to their half of the room, and one of the tanks will need to pick up Foreman Feldspar.
- If there are an uneven number of healers, have the extra healer follow Foreman Feldspar and heal the tank who is tanking him. While the raid is getting into position, and before any higher-priority targets spawn, players can spend some time damaging Foreman Feldspar.
Throughout all three phases, the Heart of the Mountain will cast  Blast upon reaching 100 Energy.
- This deals unavoidable raid-wide damage and healers must be prepared to heal through it while still managing the healing tasks created by the other mechanics of each phase.
- The rate at which the Heart of the Mountain gains Energy is influenced by his Heat level, which appears as an Alternate Power bar on the Heart of the Mountain's unit frame; the amount of Heat the Heart of the Mountain gains is determined by how well the players handle the mechanics of the first phase.

Monitor Energy and Heat to predict Blast
Heat increases Blast frequency as follows:
- 0-24 Heat: Blast occurs every 25 seconds
- 25-49 Heat: Blast occurs every 15 seconds
- 50-74 Heat: Blast occurs every 10 seconds
- 75-99 Heat: Blast occurs every 7.5 seconds
- 100 Heat: Blast occurs every 5 seconds
Phase 1: Sabotage

Loot Bombs
This is the most difficult and complex phase of the encounter. The primary objective is to destroy the Heat Regulators on either side of the Blast Furnace.
Players disable the Heat Regulators by dropping <a class="icontiny" style="color: #ffd100; cursor: pointer; outline: none; text-decoration: none; font-family: 'Open Sans', Arial, 'Helvetica Neue', Helvetica, sans-serif; font-size: 14px; line-height: 19.6000003814697px; background: 0% 50% no-repeat


