Tip: Click map to zoom
Tip: Click map to zoom
Tip: Click map to zoom
Tip: Click map to zoom
Tip: Click map to zoom
Tip: Click map to zoom
Tip: Click map to zoom
Tip: Click map to zoom
Tip: Click map to zoom
Blackhand is the final boss of the
Blackrock Foundry raid, and can be accessed after players defeat the
Blast Furnace,
Kromog, and
Iron Maidensencounters. Blackhand can be found in The Crucible, which players may enter via the Workshop's bridge across the slag pool, just opposite the main entrance to the raid.
This
Blackrock Foundry raid strategy guide provides an overview of killing
Blackhand for raid leaders as well as specific tips for tanks, healers, and dps. It also includes information on harmful trash, and screenshots of harmful abilities.
This guide provides an in-depth look at Normal and Heroic difficulties, with summaries of changes in Mythic and Looking for Raid difficulties.
Looking to log a fight and improve your performance? Go to
Warcraft Logs for logs, advanced fight analysis, replays, and more!
Table of Contents
Loot and Rewards
This loot overview helps you plan out your
Seal of Tempered Fate Bonus Rolls. Check out our
Blackhand database page to filter loot by difficulty as well as by loot specialization.
LFR (650)
-
-
-
-
-
-
Cape: none
-
Ring: none
-
-
-
Tier Item: Helm
|
Normal, Heroic, Mythic (665, 680, 695)
-
-
-
-
-
Neck: none
-
-
-
-
-
Armor Token: Any Slot
|
 Elemental Rune
 for the
legendary questline can be obtained while on
 Might of the Elemental Lords
.
Mythic Blackhand drops the
 Ironhoof Destroyer
 mount and awards the
%s Ironbane title.
Each
Blackrock Foundry boss, as well as
Highmaul bosses, has a unique achievement that counts towards
 Glory of the Draenor Raider
. This rewards
 Gorestrider Gronnling
.
Blackhand's special achievement is
 Ashes, Ashes...
.
There are achievements for killing each
Blackrock Foundry boss, as well as
Highmaul bosses, on Mythic difficulty. Killing every boss rewards
 Mythic Draenor Raider
, which allows you to place a special monument in your Garrison.
Notable Trash Mobs
Crucible trash was not tested on Beta. This section will be updated when more information is available.
Tips & Strategy
Blackhand is a three-phase encounter that is primarily single-target, with one phase having important adds that must be burst down. The fight requires raid awareness, moderate to heavy movement, and quick execution of key mechanics by randomly-chosen members of the raid.
Blackhand will use a few basic abilities during every phase of the encounter; the way in which players must respond to these abilities changes slightly in each phase.

Arrow indicates direction of Impaling Throw
 Marked for Death
 will target two players with a 5-second debuff. At the end of these five seconds, Blackhand will target these players with
 Impaling Throw
.
- Impaling Throw deals extremely heavy Physical damage and debuffs the player with
 Impaled; this will likely be fatal
- In the first two phases, Impaling Throw will strike the first object it passes through, including other players, environmental objects, or other enemies
- The rest of the raid must avoid intercepting the Impaling Throw, by moving out of the path between Blackhand and the Marked for Death targets
- Blackhand will display arrows at the base of his character model to illustrate the Impaling Throw direction
- In Phase 3, Impaling Throw passes through all objects and strikes any player in its path, so the Marked for Death target must move to a clear space
- The Impaling Throw in Phase 3 will knock the affected player(s) off the edge of the platform; this is unavoidable for the Marked for Death targets
- Marked for Death targets receive a 30% movement speed boost while debuffed, to ease positioning

Armed Slag Bomb
s are summoned throughout the fight, and become armed after three seconds.
- When triggered,
 Slag Bomb deal heavy Fire damage to all players within 10 yards
- Affected players also become
 Slagged, taking double damage for 15 seconds
- In Phases 1 and 2, Blackhand periodically throws 3 Slag Bomb into the encounter area, and players can move away from them to avoid triggering them
- In Phase 3, Blackhand will
 Attach Slag Bombs directly to players, and those players must move out of the raid to a safe place
Molten Slag slowly fills the room in Phase 1
Blackhand will target the current tank with
 Shattering Smash
 every 30 seconds.
- Although the Shattering Smashdamage is split between all targets within 6 yards, in Phase 1 and 2 tanks should ensure the ability only ever hits the current tank
- Players struck by Shattering Smash are knocked back, lose all threat, and gain
 Broken Bones, stunning them for 3 seconds
- Shattering Smash damage is moderate in Phases 1 and 2, and a tank can easily manage the damage with weak cooldowns
 Massive Shattering Smash in Phase 3 no longer stuns players, and it deals very high damage; the raid should stack to split the damage with the tanks
- After a tank is struck by Shattering Smash, the second tank must taunt Blackhand
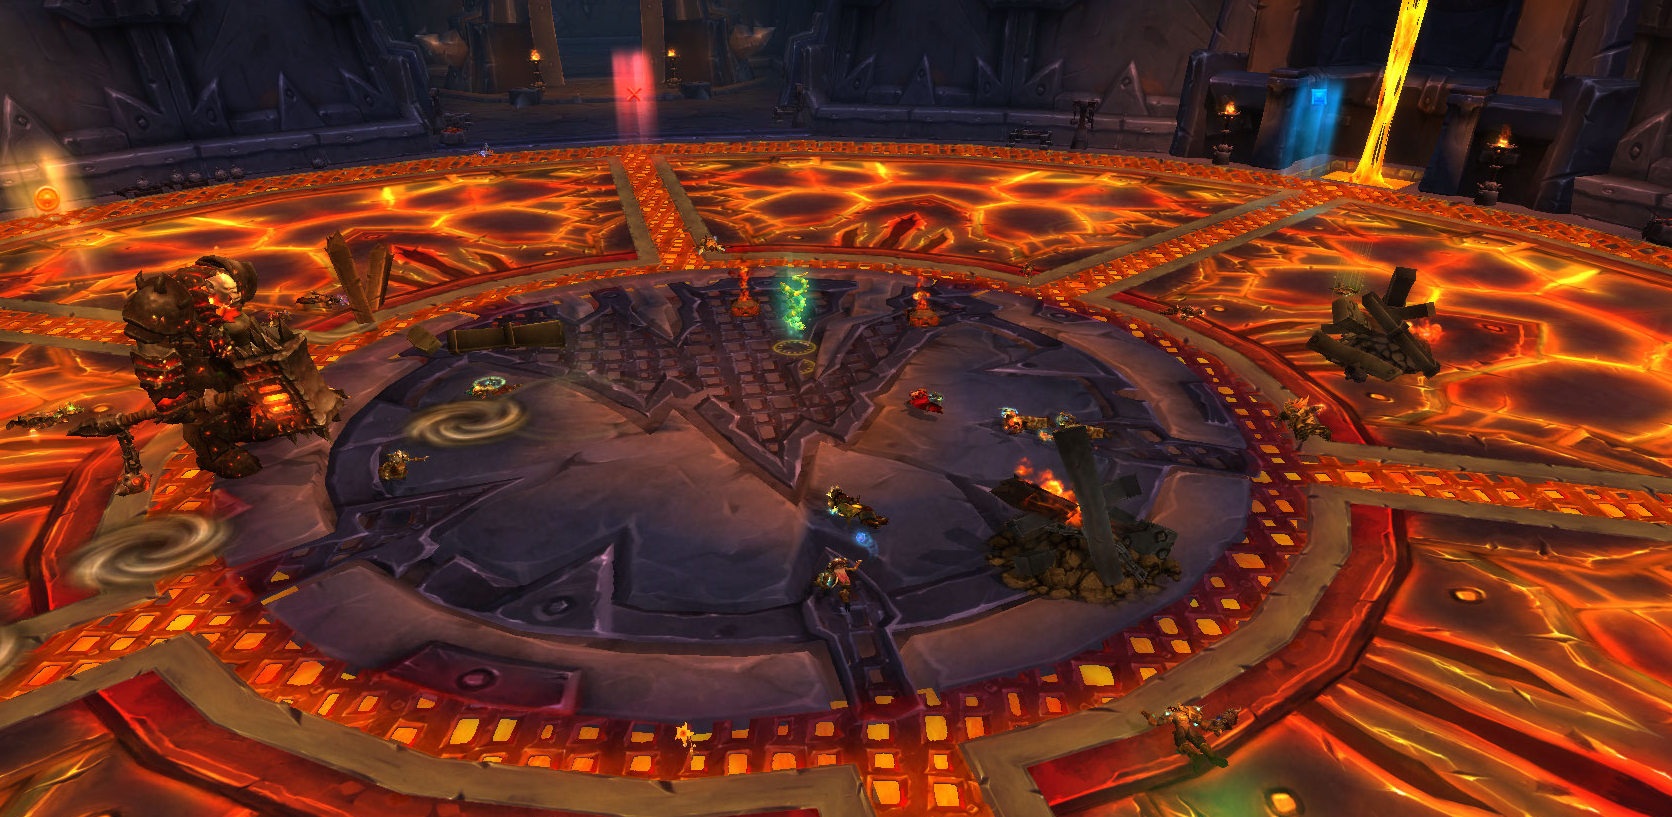
Phase 1 takes place in The Crucible, and persists until Blackhand reaches 70% health.
 Molten Slag
 flows into the edges of the encounter area, heating the floor beneath players' feet and applying
Burned to players standing in the heated area.
- This serves as a soft enrage mechanic on the first phase; players must push Blackhand below 70% health before running out of space
- Begin the encounter at the edges of the room and gradually move toward the center as Molten Slag expands
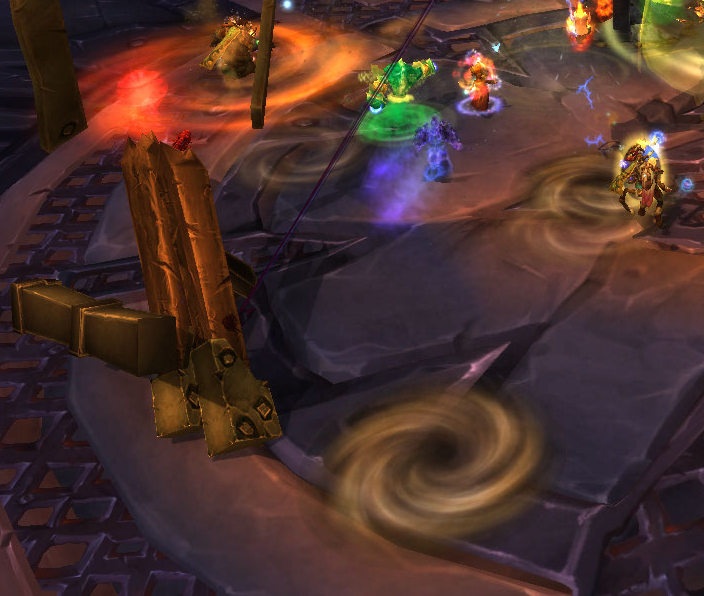
Demolition (small, pale) and Massive Demolition (large, orange)
During Phase 1, Blackhand will use
 Demolition
approximately every 35 seconds, causing debris to fall from the ceiling and damage the raid.
- Small, pale swirls indicate the location of Demolition impact
- Demolition deals moderate Physical damage to players within 12 yards of these impact zones
- This ability also creates three Massive Demolition zones (large, orange swirl)
- Massive Demolitiondeals heavy Physical damage to all players in the raid
- Demolition and Massive Demolition damage is reduced the further players are from the impact zones
- Players should move away from impact zones, and healers should use CDs to manage the Demolition damage
Debris Piles will form at the
Massive Demolition locations.
When Blackhand reaches 70% health, he will drop an Iron Star from the ceiling, crashing through the floor. The boss and all players will fall into the Storage Warehouse below the Crucible. Players will take fall damage, so healers should top the raid up as Blackhand nears 70%.
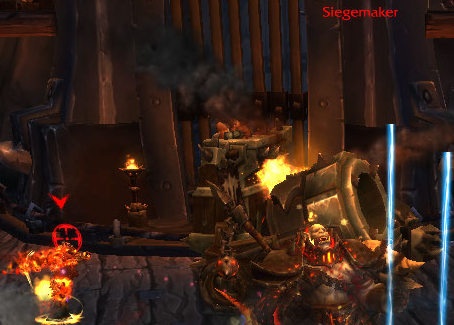
Marked for Death: LOS behind Siegemaker
Shortly after entering this phase, and once every 50 seconds thereafter, Blackhand will call on a
Siegemaker tank to join the fight.
- The Siegemaker will
 Fixate on a random ranged target until it is destroyed; it will only change targets if the Fixated player dies
- Siegemaker will use
 Battering Ram if players step into range
- The Fixated player must kite the Siegemaker in a predictable path so that the raid can avoid Battering Ram damage
- When a Siegemaker reaches 100 Energy, it will fire a
 Mortar, creating a
  Blaze that damages players in the area and applies Burning
- After firing a Mortar, the Siegemaker will gain
 Overdrive, causing subsequent Mortars to occur more frequently
- Players must kill Siegemakers quickly to prevent Blaze from filling the encounter area
Siegemakers are protected by
 Blackiron Plating
, but this can be removed if Siegemakers are struck by
Impaling Throw.
Players in the red circle will be sent to balcony
As Phase 2 progresses,
Iron Soldiers will appear on the balcony, firing
 Explosive Round
 at random targets.
- Ranged DPS and healers should spread out during this phase to avoid splashing Explosive Round damage
- When Blackhand uses &n


